Saturday, July 27, 2013

How We Handled... Sand in the Hair

In the beginning of June, I shared a style update of Hope's box braids.  I expected at that time for her box braids to last a few more weeks.  Well, it's been a while since I posted and I wanted to share that her braids did last a few more weeks!  In fact, we didn't start to remove them until the last weekend in June.  The decision to remove them at that time, though, was made for us by a certain...shall we say...hair disaster.


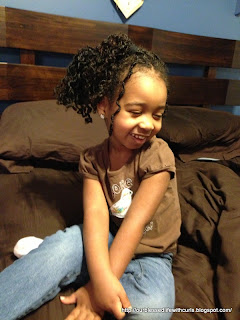
Look closely at the photo above, and hopefully what you will notice are the smiles on my children's faces.  Look at the backdrop of the photo, and you can, of course, see that we were at the beach when the photo was taken.  Beach setting + "hair disaster" = can you guess it?  Yes, we had an issue with sand.  As you will see, though, the word "issue" does not even come close to describing just how much sand we had to deal with in my daughter's hair on this day.

Anyone who understands the unique qualities of African and African American natural hair knows that sand and natural hair do not mix well together.  Just a little bit of sand can be a big problem.  On this day, we did not have just a little bit of sand.  Far from it.

Here's what happened...

Our local beach has a swingset which my kiddos were playing on.  Hope was swinging away happily when she took a fall.  Head first.  Into the sand.  My first concern was her safety!  (She was fine...crying for sure, but not hurt at all, thankfully!)  After holding her and determining that she was okay, I then took a moment to look more closely at her hair.  The photos below don't even come close to actually showing just how much sand was in the hair, but hopefully you can get a bit of an idea of what I was dealing with:


Keep in mind that Hope was wearing about 100 mini box braids, and you may be able to imagine the amount of panic I was feeling when I examined her hair.  Each braid was covered in sand, and Hope's scalp was also covered in sand.  I knew my reaction was very important, though, so I was careful to project calmness.  I knew that we needed to go home to begin addressing the sand, but I also knew that how I handled this disaster event would communicate something important to my daughter.  Hope's hair care is important, and I would certainly be addressing the sand in short order...but, we were at the beach and we needed to enjoy that time anyway before heading home for hair care!  Remember that photo of Geoffrey & Hope at the top of this post?  That picture was taken after Hope fell in the sand, and after we all spent about 15 more minutes playing on the swings.

Once we were home, it was time to start taking care of our "issue with sand."  How did I handle it?  I recalled a very helpful post I had read previously at Chocolate Hair Vanilla Care regarding sand, and I remembered that the go-to tool recommended in the post was a vacuum.  That's right...a vacuum.  Since mine has a hose attachment it was the ideal method for me to try.  One at a time, yes one at a time, I vacuumed the sand (as best as I could) from scalp to tip from each of Hope's braids.  That method removed a great deal of the sand from the braids, but not all.  Here you can see there is a lot less sand in the upper section of Hope's hair compared to the lower section, which I hadn't vacuumed yet.


After finishing the vacuuming, I washed and conditioned Hope's hair in the bath.  Normally, I just use a cup to pour water over Hope's hair, but this time I did use the hand held shower head for wetting and rinsing, which seemed to help.  I was very pleased with the results at the end of Hope's bath:


Virtually sand-free!  (Which is more than I can say for our bathtub, which had a huge amount of sand in it!)

And, so began the process of removing Hope's box braids.  Which was just in time, really, since we had plans for Hope to participate again this year in Fros on the Fourth.  (Even though July has nearly come to a close, I still intend to share the photos of Hope's Afro coming soon.)

As important as properly caring for Hope's hair was on this day, I knew it was equally (or even more) important for me to display a loving attitude throughout the process.  I made sure to stay patient and gentle as I worked.  Then, when it was all done for the night, I said to Hope:  "Do you know what is going to happen if you ever get that much sand in your hair again?"  (Assume a mock-stern tone.)  Her response was something to the effect of how much trouble she would be in.  I said, "No, if you get sand in your hair again, then I will take care of it again.  That's all!"  The best part was when Hope said, "When I grow up, I be a Mommy, when my daughter gets sand in her hair, then I take care of it!"

Blessings,
Nikki

Monday, June 3, 2013

Box Braid Style Update

It has now been seven weeks since I put in Hope's box braids, originally done with cornrows in the front and about 75 box braids in the back.  (You can see the original style here.)  I intended for the box braids to last a good, long time (and they are!), but planned to restyle the cornrows sooner than I ended up doing it.  I wrote a bit about that a few weeks ago.  Two Saturdays ago (yes, I know... almost six weeks into the style and probably about 4 weeks later than I planned!) I finally sat Hope down to redo those cornrows.

I started by co-washing and deep conditioning Hope's hair with all of her braids and the cornrows still in.  (I used Shea Moisture Coconut & Hibiscus Co-Wash Conditioning Cleanser and Oyin Handmade Honey Hemp Conditioner, which I left on for a nice, long time.) I removed only one cornrow at a time, using a pin tail comb (I followed the same basic method of braid removal that I detailed here).  After the cornrow was removed, I added some product (Oyin Handmade Hair Dew) and removed any shed hair by gently finger combing the hair.  I further sectioned the hair to form at least two mini box braids in each row.  Before braiding, I added pomade (Oyin Handmade Sugar Berries Pomade).  In the original style, Hope had 8 cornrows.  The 4 cornrows on each side were replaced with 10 box braids, adding 20 box braids to her original approximately 75, bringing her total to about 100.

Here we are when we are halfway finished restyling.  You can see that the cornrows on the right side of Hope's head have been removed and redone as box braids (product is still very fresh so it shows up most obviously, but fades shortly).  And, yes, on the left side you can see just how fuzzy and loose the cornrows had become...although it bears mentioning that the cornrows puffed up quite a bit after co-washing and conditioning.


And the view from the top after restyling was completed:


You can't really see it much to notice it from this view, but Hope had already added a headband to the look:


As I mentioned at the beginning of this post, Hope has been wearing her box braids for 7 weeks now.  Her last box braided style lasted between 9 and 10 weeks, so I know we likely have another couple of weeks left with these braids at least.  She has been asking for a haircut (she wants her hair shorter, but Mommy is still hoping for just a trim), so when I remove these braids I will reset in two-strand twists, which is how I prefer to trim (...or cut) Hope's hair.  More on that when that time comes...

Blessings,
Nikki

Saturday, June 1, 2013

A Lovely, Simple Style

Two weeks ago, while still "embracing the fuzzy moments" I did this quick and simple style on Hope's hair.


I had previously french braided Hope's box braids, which left this nice wave.  I gathered some hair on each side and pulled the hair back off of Hope's face.  Rather than using a ponytail holder or anything to hold the hair, I simply used Hope's own hair to tie a (loose) knot.


Of course, Hope wanted to add a pink flower clip to the style and that was the perfect idea!

This style was lovely, and a nice way to pull Hope's hair away from her face.  She wore it just for the day, but it would have been easy enough to recreate if we wanted to put it in again the following day.  I spent probably about 3 minutes on her hair that morning.

You may be able to see that Hope was still wearing her (fuzzy) cornrows in the front, but those have since been removed and replaced with more box braids.  That style update is coming soon.

Blessings,
Nikki

Saturday, May 11, 2013

Embracing the Fuzzy Moments

Yesterday I realized that it has now been nearly four weeks since I completed Hope's latest style, box braids with cornrows.  Our box braids normally hold up very well, so I expect them to stay in for at least the next month or longer.  As I mentioned in the original post, however, it was my first time putting in cornrows, and I really didn't expect them to last longer than a couple of weeks.  I planned on the need to remove them and either redo them or opt for more of the single box braids in the front.  Time has just passed by, though, without me noticing a real need to do anything other than maintain the moisture needs of Hope's hair.  There has not yet been a moment when I have felt that these cornrows needed to be restyled.

Have a look~


You may notice that the cornrows are beginning to look a little fuzzy.  Well, maybe a lot fuzzy.  It's possible that you took one look at those cornrows, especially in the second photo, and you thought to yourself, "She needs to do something about that!"  For the cornrows are definitely not as tight and sleek as they were when I put them in, for sure.  Some of Hope's little 'baby hairs' have sneaked out of those cornrows, and, yes, they are also looser than they probably should be.

So why haven't I addressed the fuzz yet?  I guess the answer lies in my thoughts on fuzz, and also in my answer to another question:  Why do people care so much about fuzz?

My daughter is only four years old.  I certainly love the way her hair looks when it is newly styled and looking sleek and fresh (fuzz-free), but I don't love the way her hair looks any less after a little time has gone by and that sleek look has gone a little fuzzy.  I also don't see the need to subject Hope (or her hair) to repeated and (in my humble opinion) unnecessary styling just to correct what some may see as a fuzzy style.  As long as the moisture needs of my daughter's hair are being met (and they are) then I am not bothered by the fuzz.  Hope certainly doesn't even notice, which means she obviously does not care...so why should I make her conscious of her hair looking fuzzy at such a young age?  Soon enough, she may start to listen to the world's opinions about her appearance, so why start now?  I would rather help her celebrate and love her hair at every stage of every style--and yes, that means embracing the fuzz!

Now...I would like to see Hope get at least another month out of her box braids.  Will I let the fuzzy cornrows go for another month?  No, likely not.  But I'm not in a hurry!  I am also without a set plan...I may simply redo the cornrows or I may replace them with additional box braids in the front.  Hope has a dance recital at the end of May, so that may influence my decision.  I'll post a style update once we're done.


We are definitely getting good use out of this style, as we always do with box braids.  In the photo above, I had put all of Hope's braids into one large french braid and left that in for several days.  When I removed the french braid, Hope's box braids had this lovely wave.  She's also been playing around with accessories, such as those cute little pink and purple clips as well as some headbands.  Also adorable was the ballerina bun which she wore a week ago.


The message of this post is so much more than to show off some photos of how we've been styling Hope's braids, or even to comment on my thoughts about fuzzy hair versus sleek hair.  It really goes to the heart of my philosophy on Hope's hair care...it is for Hope, and, as such should always be driven by my desire to honor her needs as well as her stage in life (i.e., while she doesn't notice the fuzzy look at age four, I'm sure she will at age fourteen and so my approach to it will change to honor that when that time comes).  While the world will certainly notice Hope's hair, and some people may express opinions (favorable or otherwise), I must never care more about those opinions then my own and that of my daughter.  I must also trust my own instincts about how to care for her hair, including how and when (or whether) to restyle a look that has gone fuzzy.

How about you?  Do you embrace the fuzzy moments?

Blessings,
Nikki

Friday, April 19, 2013

Box Braids with (my first ever!) Cornrows


Yes,  you read that title correctly... Hope's latest style features her mother's very first cornrows!  I've tried to do them before and never quite gotten the hang of it.  Recently I french braided/cornrowed Hope's mini box braids, though, and that got me thinking of giving it another try on her loose hair.  So, I did, and at last we found success...although I'm sure with lots of room for future improvement.

Here are all the style details...

I want to start by saying that, as any of you who've done a large number of box braids knows, doing this many braids takes patience and T-I-M-E!  With a four year old, and with an unusually busy week last week, though, I didn't even think of attempting to complete the style in one (or even two) sessions.  We began by washing and conditioning in sections, and just doing a little bit of 'pre-detangling' in the tub.  I loosely twisted each section as I completed it, and left those twists in for the final rinse.  I then added coconut oil which I had warmed up so it was in liquid form.

After leaving the bath, I detangled each section of hair (working in four sections) and then banded each section for stretching.  That was all I intended to accomplish on the first day.

I wasn't able to begin working on braiding Hope's hair until two days after banding, and when we began that process Hope's hair had dried completely and was nicely stretched.


My plan was to remove bands in just one section at a time and then put in the box braids in that section.  That's exactly what I did over the following several days as time allowed.  Hope wore a number of 'transitional' looks during that time, and we're just okay with that!  I was aiming for very small braids as they last a nice long time for us (the bottom row contained six actually, and the pictures show just how long her hair is, too).


This is the length of hair I am working with for each braid!

I am aware of starting each braid tight, while not pulling excessively on Hope's scalp, 
and also keeping the braid tight throughout.

To finish off each braid, I simply twist the ends.


Here (above) is one of those 'transitional' looks I mentioned.  When we were about halfway finished, I removed all the colored pony o's I had used for banding and instead put in two large braids.  

When I (at last) reached the front section of Hope's hair, that is the moment I decided to try out putting in cornrows.

Hey!  It worked!

So, I added eight cornrows going away from Hope's face, and each cornrow ended in another long braid.  In addition to the eight cornrows in the front, Hope has about 75 box braids in the back.  I expect those to last a couple of months.  I also expect to either have to redo the cornrows, or put in box braids in the front instead at some point.  We'll figure that out when the time comes.


Hope is really enjoying these braids.  On a couple of days, she has worn them with these cute little pink & purple clips, but those are totally optional.  Other days, she has wanted to just wear them 'plain.'  

Products used:

In the bath...
~Organix Coconut Milk Shampoo
~Shea Moisture Coconut & Hibiscus Curl & Shine Conditioner
~Nutiva Organic Coconut Oil

For detangling...
~Taliah Waajid The Great Detangler

For braiding...
~Oyin Handmade Juices & Berries (I needed a little of this to soften each dried section before parting)
~Oyin Handmade Sugar Berries Pomade
~Shea Moisture Coconut & Hibiscus Curl Enhancing Smoothie (just a little bit on those ends)

Blessings,
Nikki

Friday, April 5, 2013

Faux Hawk

I love reading natural hair care blogs, and I'm also always on the lookout for something cool or helpful over on Pinterest.  I collect the resources and photos that interest me on my "Natural Hair Care" board.  Stop over!

Recently, I was inspired by a post I found at Beads, Braids and Beyond to try a really cool, and I do mean cool, hairstyle with Hope... the faux hawk.  When I showed the photo to Hope of this style, her response was, "WOW!"  She was in!  The only condition I had, as mom, was that this style would go in after Easter.

So, sure enough, Monday morning we put in the faux hawk, and Hope has been happily wearing it all week.  The faux hawk was a very easy style for us to accomplish, especially since Hope was already wearing her Afro puff.  I followed the instructions at the BBB post, which were seriously simple!  I did not put in exact parts, just gathered Hope's hair into three sections and banded them at the base with a cotton pony O.  The ponytails went right down the middle of Hope's hair.  Because she has very long hair, I folded her hair over to the side and used bobby pins to secure her hair.  That's it.  Really.

Easy enough maintenance, too!  Each night I have put in 4-5 two stranded rope twists (keeping in the original 3 ponytails), and then in the morning I removed those and repinned the faux hawk.  (Each morning I did ask Hope, "Do you want to wear the twists today, or do you want me to put in your faux hawk again?" to which she would emphatically answer, "My faux hawk!")


Here's Day One:


She said this was her 'cool' face


 And morning maintenance:
Twisted from overnight

Letting down the twists shows just how
seriously long Hope's hair is.

Half pinned

Finished in about five minutes!

 I really didn't use much product in maintaining this style.  A little spray of Oyin Handmade's Juices and Berries was just about all we needed.  This is definitely a style we will come back to, and the best part was just how much Hope loved it!

Blessings,
Nikki


Monday, April 1, 2013

An Afro Puff


We started out with different intentions for Hope's hairstyle for Easter, but life presented us with a different idea today.  Earlier in the week, the hair care routine started in the bath with washing, conditioning, and coconut oil application.  I worked with Hope's hair in the sections that were from her last style, did a little finger detangling in each section, and then twisted each section when complete.

After her bath, I used my detangling comb to detangle Hope's hair, again, one section at a time.  (I did further divide Hope's hair, making her one large puff into two sections, so that her hair was parted down the middle, with three sections of hair on each side of the part.)  I started in the front, and made a rope twist in each section as I finished it.  What I ended up with was essentially piggyback twists with each twist connecting into the section of hair below and forming the next twist.  I did not band the base of each twist, but I did add 5 bands at the ends of the two piggyback twists.

You can see the twists in this oh-so-cute picture
of Hope with her big brother...
It was his 12th birthday that day!

Normally I band Hope's hair for stretching, but I was so pressed for time that day that I really did not have time to put in all the pony-o's it requires to properly band her very long hair.  So, I was thinking I could stretch with twists instead and it would be faster.  Well, it was faster, but it did not turn out to be the right method for us.  I will definitely return to banding the next time.  Hope has a lot of new hair growth around her hairline (in the front and the back) and these shorter hairs just did not get pulled into her twists neatly enough, so that by the end of the next day, she was looking pretty (shall we say) fuzzy.  More importantly, as I removed each twist today, I saw that the sections had not stayed as well detangled as they do when banded.    We had originally planned to put in regular two stranded box twists, but I did not wish to have a fight on our hands, nor did I want Hope to be uncomfortable, so it was a good time to change our plans.

What I settled on, which made Hope very happy, was a simple (well, simple is a relative term here) high pony, or more accurately in our case an Afro Puff.  With all of the length and thickness of Hope's curly hair, this really is not as simple as the word 'simple' implies.  I began by spraying each section with Oyin Handmade's Juices and Berries and applying coconut oil.  I only (lightly) finger detangled.  I followed the same steps in each section, and then began the process of gathering all that hair into the puff.  I started in the front by applying Oyin Handmade Sugar Berries Pomade (quite generously) to the hairline.  I smoothed it in with the palms of my hands and then very gently brushed Hope's hair back from her face.  I did the same thing in the back, underneath Hope's hair, this time smoothing upward.  Then I just formed the puff, trying to make it as high as I could.  I secured it with a cloth pony-o (no metal), which I managed to get around twice...with patience for sure!


After putting in the puff, I put on a satin sleep scarf to smooth down the edges, and set to work adding curl defining products.  I used Shea Moisture Organic Coconut & Hibiscus Curl Enhancing Smoothie and Curling Souffle.  I raked each product through her curls in small sections to be sure it was evenly distributed.


After removing the sleep scarf


To maintain Hope's style, I will put in a few loose braids or twists at night.  I will reapply one of the curl defining products in the mornings as needed.

I think it is a very cute style for Hope.  It was quick for me to put in (which was a plus today) and she loved it, which is most important in my book.  Best part of style time for me today was when Hope said, "This is good hair!"

Blessings,
Nikki

Sunday, March 24, 2013

Little Girl's Curled Box Braids

I already shared how I remove box braids, but I thought I'd take a moment to show one of the ways Hope wore her 130+ braids recently.  I love the versatility of having Hope's hair in box braids, as I can quickly put her hair in pigtails or a high ponytail or she can throw in a headband.  But one of my favorite things to do with her braids is actually to braid them (these are probably my beginner's versions of cornrows, actually...maybe someday I'll be able to cornrow Hope's loose hair).  I did this twice during the last couple of weeks Hope was wearing the box braids.  After conditioning her hair in the bath, I would braid the braids while they were still wet.  That was a cute look all on its own, and I left the hair like that for several days.  But the style really looked cute after removing those cornrowed braids because it left the braids curly.


I really loved the look of Hope's curly braids, and she really did too!  This is another style that she receives a lot of compliments on.  I was amused by the lady who asked me if I had a special curling iron to curl all those braids.  In my mind I was thinking, "Do I look that crazy?"  I didn't actually say that, though.  I just gave her a quick response that explained how the braids were curled (without the use of a curling iron).

Blessings,
Nikki